· Programming · 8 min read
System Design - My Approach to Programming Projects
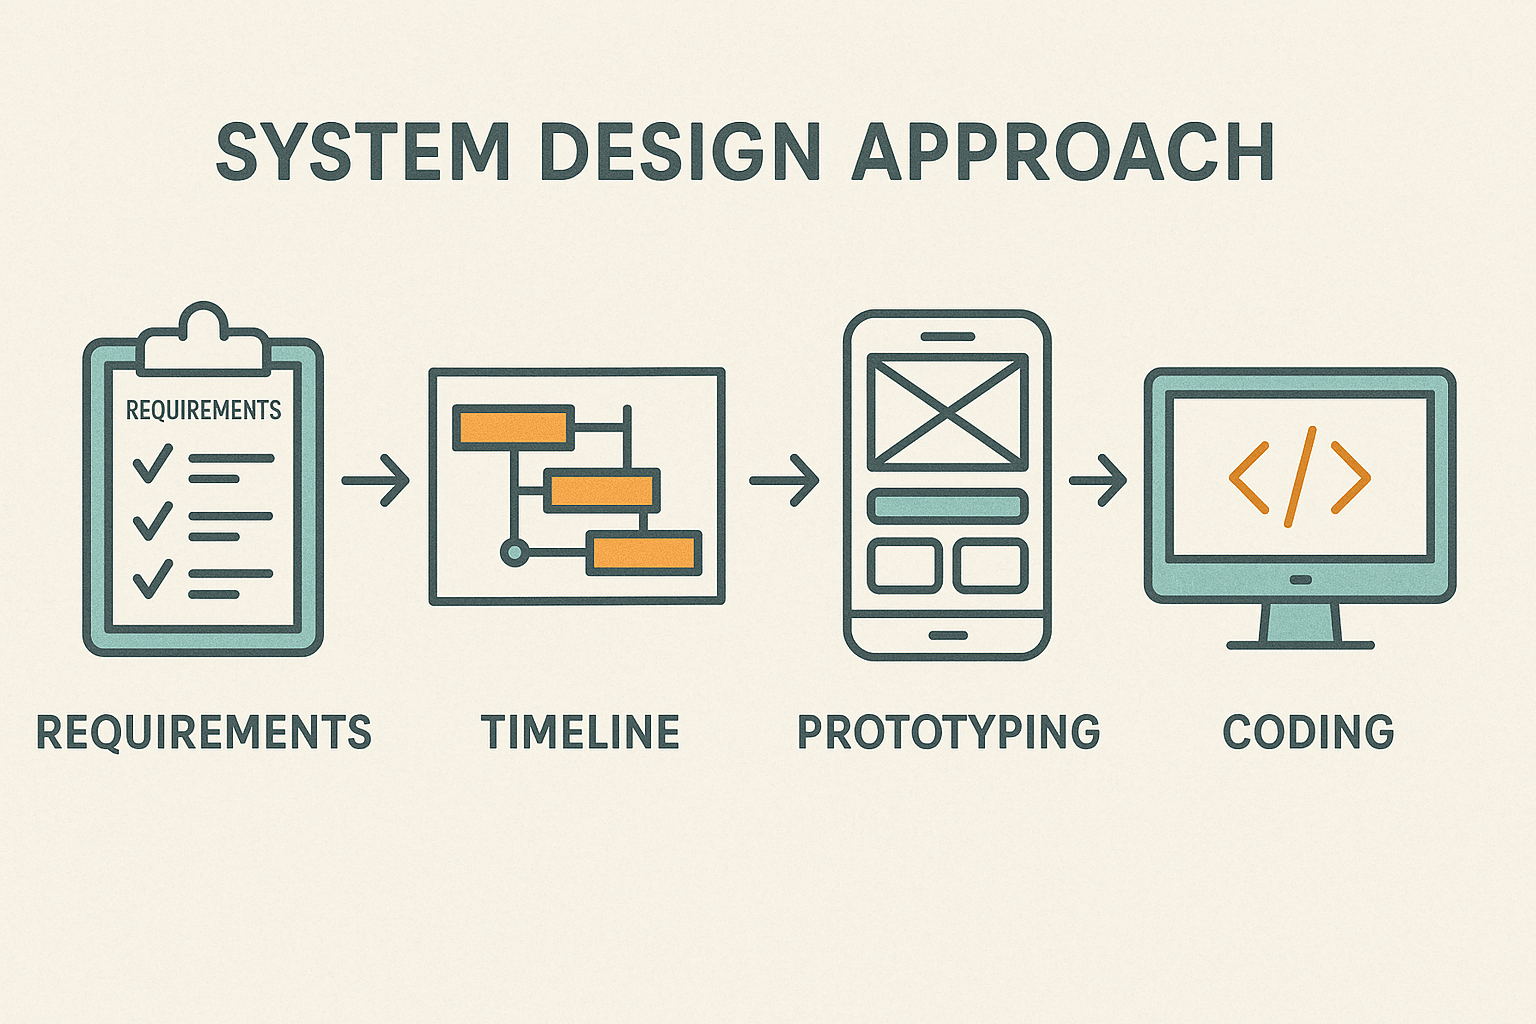
System Design involves planning on how to tackle a project, utilizing requirements, a timeline, and prototyping.
Talking to others in the industry has become an invaluable source of information for me. Not only do I learn about new topics and technologies, but I also gain new skills and habits that help me to create better software. One thing I picked up is the System design approach.
Planning and defining how a system will come together based on its components and their interactions
- Paraphrased from Google Search
Planning is a key aspect of this approach. Whether one follows this approach or not, planning before jumping into programming a project is important. Admittedly It’s more fun to get into actual coding than coming up with documentation, but it can save a lot of time and headache.
Before I continue, I want to emphasize that this post is not going to teach you System design. There’s a whole sleuth of information out there about the topic in which more qualified people can inform you about. What this post will be about is how I utilize a System design approach. Using a System design approach
There’s a lot of steps involved in this approach and it is meant for large projects that feature a team, not just one sole programmer. But there are things that I picked up on that I liked and by doing some research I gained a better understanding. So, I devised this brief list of steps that I can follow (and perhaps you as well) when taking on a project.
- Coming up with requirements
- Creating a timeline
- Prototyping (and collecting feedback)
- Coding a solution and testing
Coming up with requirements
Before I start working, I need to come up with a list of requirements; things that the software I am developing must do. If I am developing a piece of software for someone, then that is whom I will get my requirements from. That could be a client or the public. Or even myself! A helpful exercise for coming up with this list is developing user stories. These are basically short paragraphs or a couple of sentences that describe a scenario. The typical format for a user story is describing what the user will do and for what reason. For instance, if I were developing a game, a user story could be “I want to save my game so that I could come back to it later”. The requirement will be developing a save system.
This can help get things rolling but ideally the requirements should be specific, measurable and realistic. This way you can measure progress and know (roughly) how long it will take to complete tasks. If you come up with an overtly complex and unrealistic requirement, not only will it take away a lot of time from the rest of the project, the stress and burden can leave you feeling unenthusiastic and unmotivated.
Creating a timeline
Coming up with a timeline (how long individual tasks and the whole project will take) can be tricky, especially if what you are working on is new to you. Start off with coming up with time estimates for the requirements. You’ll likely have some for requirements you have worked on before. If not, try your best to come up with an estimate, using previous experience on similar tasks as a gauge. Remember that this is just an estimate and doesn’t have to be exact.
With time estimates done, I can work on establishing an iteration. This is a group of requirements that are completed within a time frame. An iteration is typically about a month. But remember a lot of this process involves a team. As a solo developer or working with one other person, the project will be smaller in scale and iterations can be smaller as well. Once I’ve set an iteration, I can start piecing in the requirements. For example, if my iteration is one week (typically considered a business week which is 5 days) and my requirements take one day, I can fit 5 requirements into an iteration. Usually an iteration will revolve around a section or feature. In the example discussed earlier, this could be for the save system.
Once iterations are done, this becomes the timeline (which is a group of iterations). Working solo, requirements will be done one after the other. If you are part of a team, things can be done simultaneously but watch out for dependencies. Some requirements can’t be worked on unless another requirement is done first.
Timelines help me gauge process and how to organize how I am spending my time. It will help me know if I am spending too much time on a task (which happens quite a bit for me) and what to focus on.
Prototyping and collecting feedback.
A prototype is a mock up of your software which is usually non-functional. Getting an idea of how something works can help you gain a better understanding of what the final product will look like. There are two types of prototypes, which are high-fidelity and low-fidelity. This basically refers to how detailed the prototype is. A common high-fidelity prototype is a wireframe, while a common low-fidelity prototype is a paper prototype.
A paper prototype is essentially a series of drawings that represent different states of a software (logging in, making a purchase, creating an account, etc.). A scenario is presented which a person will pretend to go through, using the prototype.
An example:
A wireframe is what many think of when they hear about prototypes, something that looks like the actual thing and sort of works. There are programs available for creating wireframe prototypes, such as Figma (which I typically use).
When I’m working on a project, I like to do a very basic high-fidelity prototype. This is basically a rough prototype that is similar in quality to a paper prototype but has some functionality that is closer to a wireframe. I’ll get into why I do this soon but ideally you would start with a low-fidelity prototype and move on to a high-fidelity prototype. Time and resources might lead you to just pick one.
Feedback comes in by going through your prototyping sessions. Like in the video, you would have someone try to accomplish a task and get their input from it. You would want to gain as much feedback from as many people as you can get.
But if I’m working on something on my own and for myself, I will go through it myself which can still provide some insights. If you are part of some online communities, you can share your prototypes and get feedback from those who use it. This is the main reason why I do the basic high-fidelity prototypes. I would rather do the paper prototype so I can do something quickly but it’s difficult to gain feedback from others in person. Doing a wireframe means I can easily share them to others and gain feedback that way.
Implementing a solution and testing it out
Now that I have all this information, I can begin building the actual application. I know a lot of people (myself included) will just start here and disregard everything else I had described before. But there is a point to this: stop and think about it. For most projects, software or not, there is always planning, analyzing, designing, etc., that is usually done before any sort of building is actually done. Working on something only to realize that you missed something or did it differently then you were supposed to and have to start over can be overwhelming. Not to say that by doing everything I described it is a guarantee you won’t make mistakes, but you will greatly reduce those chances.
And always test! This is something that is constantly neglected or taken very casually. Testing shouldn’t just be using the software a few times, finding nothing wrong and then calling it a day. And it also shouldn’t be testing everything 100%, making sure every little thing is perfect (unless it’s critical). Testing should cover a majority of the application and be done at different junctions of the project (new features, completed sections, revisions, etc.). Testing should be part of the building process and not left for after. It can be a burden to try to figure out an error and have to look at everything as a whole.
A new release
Once I’m satisfied with all of this, I make a new release. But creating software is a cycle. Even after I release my application, I will likely have to go through most of this again. Maybe there is a feature I haven’t considered initially that everyone is telling me should be included. I’d have to test things out and gain feedback on how well it works. All this ensures that the application works well, is robust and won’t go stale.
If anything from here has helped you, please let me know. And if there is something that needs clarification or if it seems just flat out wrong, also let me know. This is still a learning experience for me and greatly appreciate your input.